Step 2 - Access the content created in the Kanzi Studio project

In this tutorial you create a widget store where you can browse and select widgets in one view and select widgets to see their descriptions in another view. When running the project at the end of the previous step you saw only the application background. The kzb file you created from the Kanzi Studio project and loaded using the API in the previous step of this tutorial, includes all the nodes and resources you need to create the application logic using the API:

To access content from the Kanzi Studio project using the Kanzi Engine API:

  1. Include the iterator standard header.
    #include <iterator>
  2. To create the prefab instances and add them to the Widget Grid List Box node you need to get access to these assets by loading them from the project. To access the loaded project assets in the application code later, create and store the assets in the member variables of your application class.
    private:
    
    	// Grid List Box 3D node which contains the widgets.
    	GridListBox3DSharedPtr m_widgetList;
    
    	// The currently selected widget in the Widget Grid List Box node.
    	GridListBox3D::ItemSharedPtr m_selectedItem;
    
    	// The camera of the scene.
    	CameraSharedPtr m_camera;
    
    	// Transformation target for the camera animation.
    	SRTValue3D m_cameraTransformationTarget;
    
    	// Animation clip for animating the camera.
    	SRTValue3DAnimationSharedPtr m_cameraAnimation;
    
    	// Timeline playback for animating the camera.
    	TimelinePlaybackSharedPtr m_cameraPlayback;
    
    	// Timeline playback for highlighting the item.
    	TimelinePlaybackSharedPtr m_widgetHighlighPlayback;
    
    	// Timeline playback for enabling the Back button.
    	TimelinePlaybackSharedPtr m_backButtonEnablePlayback;
    
    	// Animation clip item for animating the selected widget.
    	SRTValue3DAnimationSharedPtr m_selectedItemAnimation;
    
    	// Description panel that contains the description of the selected
    	// widget and the Back button.
    	NodeSharedPtr m_widgetDescriptionNode;
    
    	// Animation clip for animating the visibility of the widget description.
    	BoolAnimationSharedPtr m_widgetDescriptionVisibilityAnimation;
    
    	// Timeline playback for animating visibility of the widget description.
    	TimelinePlaybackSharedPtr m_widgetDescriptionVisibilityPlayback;
    
    	// Text Block 3D node that shows the widget description in the
    	// Widget Description Layer node.
    	TextBlock3DSharedPtr m_widgetDescriptionTextBlock;
    
    	// Back button on the widget.
    	NodeSharedPtr m_backButton;
    
    	// Animation clip for disabling and enabling the Back button.
    	BoolAnimationSharedPtr m_backButtonEnableAnimation;
    
    	// User-defined property type for storing the names of widgets.
    	StringDynamicPropertyTypeSharedPtr m_widgetNamePropertyType;
    
    	// User-defined property type for storing the descriptions for widgets.
    	StringDynamicPropertyTypeSharedPtr m_widgetDescriptionPropertyType;
    
  3. In the ProgrammerTutorialApplication class after the onConfigure function add the onProjectLoaded() function.
    When you place a function inside the onProjectLoaded()Kanzi calls the function after it loads your application.
    protected:
    
        // Initializes application when project is loaded.
        virtual void onProjectLoaded() KZ_OVERRIDE
        {
        }
  4. To access the nodes in the kzb file you first have to get the Screen node and then use either aliases or relative paths to get each node.
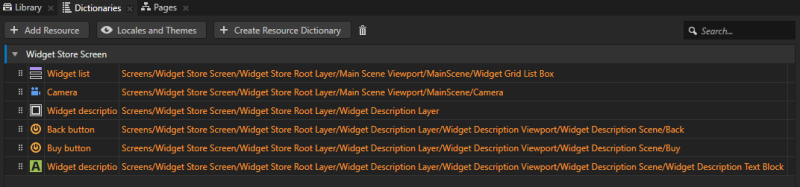
    Use an Alias to get consistent access to a Kanzi node. You can use aliases to access nodes both in Kanzi Studio and using the Kanzi Engine API or scripting. Because you move nodes in the scene graph of your project while creating your application in Kanzi Studio, the easiest way to keep track of them is to use aliases. You can retrieve alias target nodes with bindings, the API, or scripting using the hash sign (#) followed by the name of the alias, regardless of the node location in the project. See Using aliases.
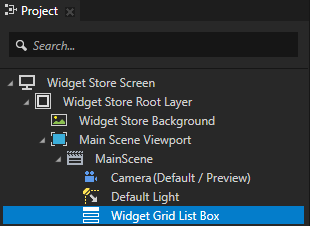
    For example, in this tutorial the alias for the Widget Grid List Box is named Widget list and is stored in the resource dictionary of the Widget Store Screen node. Use #Widget list to access the Widget Grid List Box node using its alias in the API.
    virtual void onProjectLoaded() KZ_OVERRIDE
    {
        ScreenSharedPtr screen = getScreen();
    
        // Access content from the Kanzi Studio project binary.
    
        // Get the reference to the Grid List Box 3D component that stores all the widget instances.
        // The path is defined by an Alias editable in the Kanzi Studio project.
        GridListBox3DSharedPtr widgetList = screen->lookupNode<GridListBox3D>("#Widget list");
    
        // Get the reference to the camera object node, which will be animated.
        CameraSharedPtr camera = screen->lookupNode<Camera>("#Camera");
    
        // Create the camera target transformation.
        SRTValue3D cameraTransformationTarget = SRTValue3D(Vector3(1.0f, 1.0f, 1.0f), Vector3(kzsDegreesToRadians(60.0f), kzsDegreesToRadians(0.0f), 0.0f), Vector3(-1.5f, 7.0f, -5.0f));
            
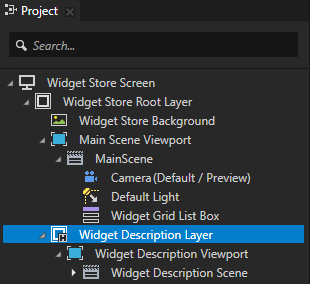
        // Get the reference to the Widget Description Layer node.
        NodeSharedPtr widgetDescriptionNode = screen->lookupNode<Node>("#Widget description layer");
    
        // Get the reference to the text block in the Widget Description Layer which shows the widget description.
        TextBlock3DSharedPtr widgetDescriptionTextBlock = screen->lookupNode<TextBlock3D>("#Widget description");
            
        // Get the reference to the Back button in the Widget Description Layer node.
        NodeSharedPtr backButton = screen->lookupNode<Node>("#Back button");
    
        // Create the animation clip for disabling and enabling Back button.
        BoolAnimationSharedPtr backButtonEnableAnimation = FromToAnimation<bool, StepEasingFunction>::create(getDomain(), chrono::seconds(1), false, true);
    
        // Create the animation clip for hiding the Widget Description Layer.
        BoolAnimationSharedPtr widgetDescriptionVisibilityAnimation = FromToAnimation<bool, StepEasingFunction>::create(getDomain(), chrono::seconds(1), true, false);
    
        // Create the animation clip for animating the selected list box item.
        SRTValue3DAnimationSharedPtr selectedItemAnimation = FromToAnimation<SRTValue3D, LinearEasingFunction>::create(getDomain(), chrono::milliseconds(800),
                SRTValue3D(Vector3(1.0f, 1.0f, 1.0f), Vector3(kzsDegreesToRadians(0.0f), 0.0f, 0.0f),  Vector3(0.0f, 0.0f, 0.0f)),
                SRTValue3D(Vector3(1.0f, 1.0f, 1.0f), Vector3(kzsDegreesToRadians(60.0f), 0.0f, 0.0f), Vector3(0.0f, 0.0f, 1.0f)));
    }
    
  5. In this tutorial you use the custom property types defined in the Kanzi Studio project. To access these custom property types create a DynamicPropertyType and use the same name that is used in the Kanzi Studio project. Properties are wrapped in a shared pointer just like resources are.
    class ProgrammerTutorialApplication: public ExampleApplication
    {
    ...
        // Type of the shared pointer for the custom property type defined
        // in the Kanzi Studio project.
        typedef shared_ptr<DynamicPropertyType<string> > StringDynamicPropertyTypeSharedPtr;
    
    protected:
    
        virtual void onProjectLoaded() KZ_OVERRIDE
        {
        ...
            // Get the custom property type for storing the widget name. This custom
            // property type is created in the Kanzi Studio project.
            StringDynamicPropertyTypeSharedPtr widgetNamePropertyType =
                StringDynamicPropertyTypeSharedPtr(new DynamicPropertyType<string>("Programmertutorial.WidgetName"));
    
            // Get the custom property type for storing the widget description. This custom
            // property type is created in the Kanzi Studio project.
            StringDynamicPropertyTypeSharedPtr widgetDescriptionPropertyType =
                StringDynamicPropertyTypeSharedPtr(new DynamicPropertyType<string>("Programmertutorial.WidgetDescription"));
        }
        ...
    };
  6. Store the acquired resources in the member variables so that you can access them later.
    virtual void onProjectLoaded() KZ_OVERRIDE
    {
    ...
        // Store acquired resources and the nodes you looked up.
        using std::swap;
        swap(m_widgetList, widgetList);
        swap(m_camera, camera);
        swap(m_cameraTransformationTarget, cameraTransformationTarget);
        swap(m_selectedItemAnimation, selectedItemAnimation);
        swap(m_widgetDescriptionNode, widgetDescriptionNode);
        swap(m_widgetDescriptionVisibilityAnimation, widgetDescriptionVisibilityAnimation);
        swap(m_widgetDescriptionTextBlock, widgetDescriptionTextBlock);
        swap(m_backButton, backButton);
        swap(m_backButtonEnableAnimation, backButtonEnableAnimation);
        swap(m_widgetNamePropertyType, widgetNamePropertyType);
        swap(m_widgetDescriptionPropertyType, widgetDescriptionPropertyType);
    }

< PREVIOUS STEP
NEXT STEP >

See also

Using aliases

Creating property types

Property system

Resource management